
Equipment set up and Shooting instructions
Immersive 3D Tours are immersive virtual tours emulating 3D environments using spherical images. The 3D tours are created directly using the single property website in your Urbanimmersive account, and images are produced with Ricoh Theta and Insta 360.
Our automated post-production algorithm utilizes visual content recognition and machine learning image classification technologies to recreate the photographer's camera path during the photoshoot.
Therefore, shooting instructions are required to ensure that the visual content automated post-production processes work seamlessly.
Failing to follow shooting instructions will result in 3D tours being rejected or preventing the 3D tour from being scaled-to-life for precise floor plan creation
Equipment Set-Up
 Camera Height
 Camera Height
The recommended height of the camera is 4 ft. If you would like to use a different camera height, ask our support team to show you how to calibrate the measurement tool.
NEVER change camera height during the same shoot. It will greatly impact the scaled-to-life floor plans and feel of the tour. If you work in teams during a shoot, make sure both photographers have the same exact camera height.

Make sure your Camera is Level
Use a monopod that you can adjust the level. Make sure the camera is always levelled.
Unlevelled 360 images can’t be used as precision anchors by our post-production processes. This will greatly impact the floor plan precision and user experience.
Having the tripod level is not the only item that needs to be level, your camera also should be.
An easy & convenient way to make sure your camera is level is to use a small bubble level or similar item.

You can set it on the top of your camera at the beginning of the shoot while making adjustments and make sure it is level. There are some available in hardware stores or on Amazon.
Shooting instruction
Virtual North (THE MOST IMPORTANT RULES)
The camera must always start facing the same direction for every 360 images. We call this our Virtual North. The virtual north can be the front, the back, the left or right wall of the house, but must stay the same throughout the entire project.
If your camera is not always facing a virtual north, the 360 camera measures and gets the light that comes in the lenses will never be measured the same way. This will lead to inconsistent final images of white balance and light intensity.
Furthermore, the stitching needed to feed the gap (in the middle of the 2 lenses) distortions when creating floor plan walls. Not always shooting in the same direction will GREATLY impact floor plan precision.
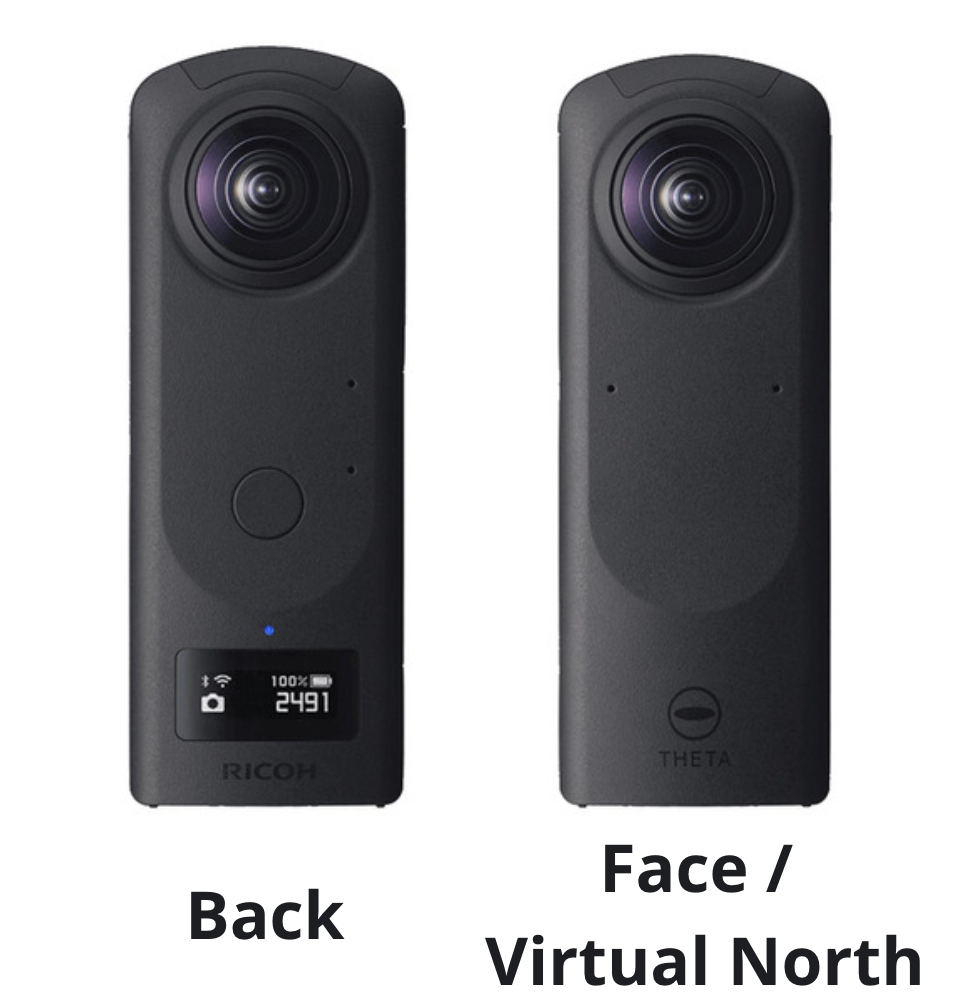
The Face of the Camera
While shooting, the Face should direct the Virtual North at all times. The Theta Icon represents the Face of the Ricoh Theta Z1. The screen that displays the shooting information is located at the back of the Camera.
Ricoh
You want to know more about your Ricoh; Click here
 Insta 360
You want to know more about your Insta360; Click here

Do not:
Point tripod in different directions.

Distance between 360 images
The distance between every 360 images should not be greater than 8 feet. Too much distance between 360 images will greatly decrease the floor plan precision and user experience.

Doors And Open Access
Each doorway will require a pair of 360 images. One before entering the room and another once inside. Make sure each 360 image has a line of sight to the paired image.
Camera Path
Create a camera path that enables viewing all rooms. A minimum of one image per room is required to create the floor plan but might not provide a good user experience.
Too many 360 images are not always better. It will take extra time on-site without really adding extra value to the 3D tour. Create a camera path that showcases the best possible pathway through the house.

Do not
Separately shoot rooms

Stair Gateways
There is no need to take 360 images on the stairs. Just take a 360 image in front of every stairway. Our post-production team will create gateways on the stairs allowing the user to jump from one level to another with a single click.
